Projects/LED-Banner: verschil tussen versies
Geen bewerkingssamenvatting |
|||
| Regel 95: | Regel 95: | ||
=== Hacking === | === Hacking === | ||
But of course you may hack on the LED-Banner! | But of course you may hack on the LED-Banner! | ||
* IP: 100.64.0. | * IP: 100.64.0.72 | ||
* Credentials: <ask someone in the space> | * Credentials: <ask someone in the space> | ||
| Regel 107: | Regel 107: | ||
* Don't display anything (r|n)ude | * Don't display anything (r|n)ude | ||
* Questions? Ask polyfloyd. | * Questions? Ask polyfloyd. | ||
== POIDH == | == POIDH == | ||
Versie van 17 jan 2018 17:57
| Project: LED-Banner | |
|---|---|
| Beschrijving | A giant LED-banner consisting of 16 5-meter long 30 LEDs/meter strips. |
| Start | 2015/03/13 |
| Contact | Polyfloyd, User:Eightdot |
| Status | Beta |
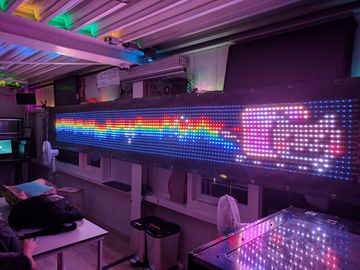
Bitlair's new incarnation of blinkenlights: the BitBanner. The BitBanner will consist of 16 5-meter long RGB LED-strips, with 30 pixels per meter totaling 2400 LEDs. They'll need 5v at about 120 Amps. To provide power 12v power supplies will be used along with 32 step down converters (4 per PCB, designed and created by Bobo1on1).
TODO
- Assemble second power supply
- Connect power supplies to led-strips wip
- Buy waterproof 3-pin connectors for the stips done
- Weatherproof power supplies
- Create a controller done
- Buy bold / nut 100 * 3mm 15mm + rings 200 done
- Buy wire for connecting led strips (1 mm2 red/black 32*1m?)
- Buy wire for supplying power to PCB's (2.5 mm2 red/black 12m)
- Buy steel wire and accessories for suspension
Controller and Firmware
All 16 strips are simultaneously being driven by Brainsmoke's HexWS2811 board which exposes a neat TTY interface to which frames can be written to. It also supports temporal dithering.
HexWS2811 resources and firmware
Building
The firmware has been slightly modified by removing one frame buffer because the MCU did not have enough RAM for triple buffering. Additionally, some defines were updated to match the specs and dimensions of the LED-Banner:
#define LED_VALUES 3
#define N_LEDS_PER_STRIP 150
#define N_STRIPS 16
The firmware is built with the Arduino IDE with the Teensyduino toolchain installed. The settings used are:
- Board: Teensy 3.2 / 3.1
- USB Type: Serial
- CPU Speed: 96 MHz
The board does not support flashing over USB, we had to manually flash the HEX file produced by Arduino ourselves.
Flashing
A BluePil with BusPirate firmware was used in conjunction with OpenOCD to flash our modified firmware to the MCU of the controller. The bottom of the board exposes both SWD and JTAG interfaces.
The OpenOCD config used:
interface buspirate
buspirate_port /dev/ttyACM4
buspirate_speed normal

source [find target/k40.cfg]

adapter_khz 1000
reset_config srst_only

# Scratch RAM for verify
k40.cpu configure -work-area-phys 0x1FFFE000 -work-area-size 16384

# One 128K flash bank
flash bank pflash.0 kinetis 0x00000000 0x40000 0 4 $_TARGETNAME
To flash:
openocd -f openocd.cfg -c 'init;halt;program '"$hexfile"' verify'
Software
The HexWS2811 board expects RGB (corresponds to the number of subpixels configured by the LED_VALUES define) data where each subpixel is a little endian short. The value of each subpixel must not exceed 0xff00 in order to not conflict with the frame termination pattern. The number of pixels to display a full frame is as you would expect, the width times the height. A frame has to be terminated with a pattern of 0xff 0xff 0xff 0f0.
This binary data must be sent to the TTY device that the board exposes.
Ledcat
Ledcat is a program created by polyfloyd which supports the HexWS2811. Ledcat reads frames with RGB24 format from stdin and handles all the setup and formatting that the board requires. Typical usage for the LED-Banner looks something like this:
./my_animation | ledcat --geometry 150x16 hexws2811 > /dev/ttyACM3
Ledcat can also accept some optional configuration options:
- --transpose reverse will rotate the image by 180 degrees
- --dim 0.5 Reduces strain on your pretty eyes by capping power output to 50%
- --color-correction none Disables the default color correction applied (THIS MAY PUT HEAVY STRAIN ON THE POWER SUPPLY)
Ledcat can be installed using the Rust package manager, Cargo, by running cargo install ledcat. If you don't have Cargo, you can probably find it in your package manager or alternatively install it along with the Rust Language.
Emulator
You can develop animations for the LED-Banner and test them on an emulator which can be found here along with some animations.
NOTE: The simulator listed above is deprecated. Use Ledcat's show command instead:
./my_animation | ledcat --geometry 150x16 show
Hacking
But of course you may hack on the LED-Banner!
- IP: 100.64.0.72
- Credentials: <ask someone in the space>
Instructions:
- Stick images with $width >= 150 in ~root/images
- Put custom programs in ~root/programs, and add them to ~/run.sh
- Output 150x16 24bit RGB to stdout for each frame. Sleep for 1/60th of a second
- Use "<your program> | ledcat show" to test, remember to export LEDCAT_GEOMETRY=150x16
- Doing this locally is better if your wifi is slow
- https://github.com/polyfloyd/ledcat
- Don't display anything (r|n)ude
- Questions? Ask polyfloyd.
POIDH
-
Sorting the LED-strips
-
The BitBanner cloth
-
Polyfloyd and his DIY LED-strip straightener
-
Aligning the LED-strips
-
Aligning the LED-strips
-
All done!
-
Rolled up (also, we moved to a new space in the mean time)
-
Brainsmoke's HexWS2811 controller
-
Powersupplies hooked up to the strips for testing
-
Wiring on the BusPirate used for flashing
-
Testing the power supplies
-
Wow, such image
-
Nyan!
-
The first use of the LED-Banner in production at the Eemplein Verenigingenmarkt
-
Nyan Cat, but it's an audio-visualization
-
We moved to a new space. Again!


