Projects/Kubusje: verschil tussen versies
Geen bewerkingssamenvatting |
Geen bewerkingssamenvatting |
||
| Regel 5: | Regel 5: | ||
|contact=polyfloyd, | |contact=polyfloyd, | ||
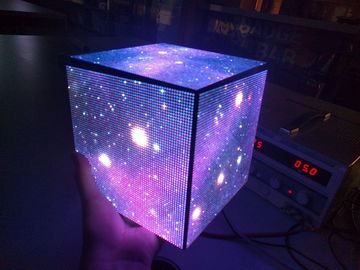
|info=Last December, I attended the 34th Chaos Communication Congress in Leipzig, Germany. One thing that really impressed me was a cube comprised of bright LED-panels. It’s awesome and I just had to get one of my own. | |info=Last December, I attended the 34th Chaos Communication Congress in Leipzig, Germany. One thing that really impressed me was a cube comprised of bright LED-panels. It’s awesome and I just had to get one of my own. | ||
|status= | |status=Beta | ||
|Picture=Photo_2018-02-11_19-08-53.jpg | |Picture=Photo_2018-02-11_19-08-53.jpg | ||
}} | }} | ||
Versie van 4 aug 2018 11:54
| Project: Kubusje | |
|---|---|
| Beschrijving | Last December, I attended the 34th Chaos Communication Congress in Leipzig, Germany. One thing that really impressed me was a cube comprised of bright LED-panels. It’s awesome and I just had to get one of my own. |
| Start | 2018/01/21 |
| Contact | polyfloyd |
| Status | Beta |
| Website | https://polyfloyd.net/post/opengl-shaders-ledcube/ |
NOTE: This is snapshot of https://polyfloyd.net/post/opengl-shaders-ledcube/ on 17 januari 2018.
Last December, I attended the 34th Chaos Communication Congress in Leipzig, Germany. This is a large tech-conference with attendees bringing all kinds of awesome projects they have been working on.
One thing that really impressed me was a cube comprised of bright LED-panels. Here's a video I took: https://polyfloyd.net/img/opengl-shaders-ledcube/34c3.webm
It's awesome and I just had to get one of my own.
I showed the video to some friends, telling them I wanted to build this. Sebastius and Boekenwuurm were as impressed as I was and wanted to join in on building one each.
And that's how a new project was started! In this article, I'd like to tell a bit about how it works and how I programmed it.
The Hardware
Sebastius was very keen to get started on the hardware. The frame, casing and power is mostly his domain, so I'll briefly describe the hardware here.
The 6 panels used are P2.5 HUB75 LED-panels bought from AliExpress. They're driven by a Raspberry Pi Model 3 Using a breakout board that support the interface these displays use.
Wiring
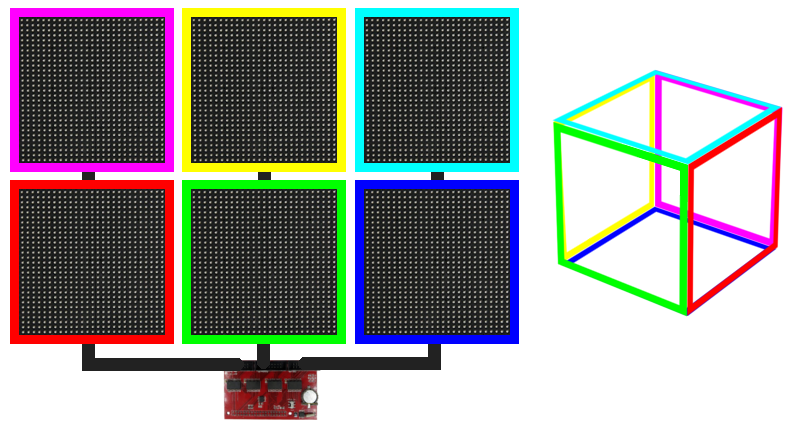
The displays are connected in 3 chains, the maximum number of parallel chains the board supports, of 2 panels each. Having a higher degree of parallelization increases the refresh rate which in turn improves the overall image quality.
The first two chains make up the 4 sides. The remaining chain makes up the top and bottom of the cube.
Frame
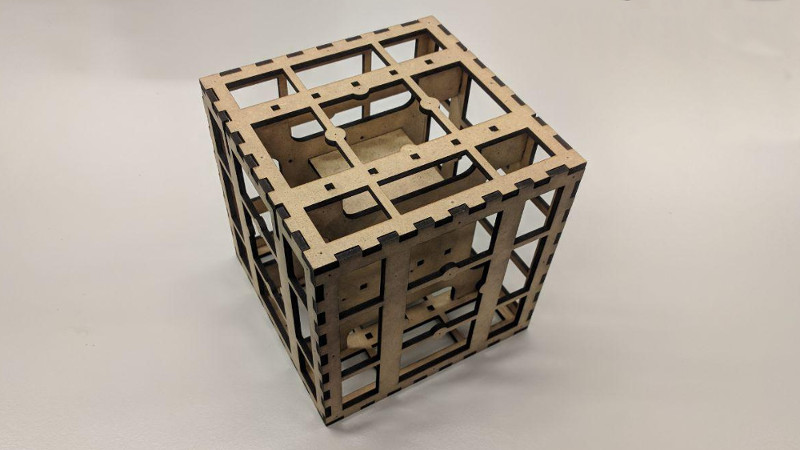
The panels come attached to plastic frames which allows them to be assembled as a larger 2D display. These frames are too thick to assemble them in a tight cube. Fortunately, they are very easy to take off with a precise screwdriver.
Sebastius designed a custom frame using Inkscape for manufacturing using a laser cutter.
If you want to know how I brought the fireworks to these panels, keep reading!
The Software
For driving the LED-panels, we used hzeller's software that was readily available. It comes with a few demo's one of which was used on the cube I filmed at 34C3.
The recommended use of the software is as library in the program that renders the animation. I created my own little program that uses my preferred method of shoving pixels around; **unix pipes!** This is something I played with Ledcat, software which I made for powering some of my other LED-projects. Adapting this interface allows programs that I wrote for Ledcat to also work with hzeller's library.
It also enables cool tricks like rendering to a (gzipped) file to reuse later:
./render-animation | gzip > my-cached-animation.rgb.gz

while true; do
  gzip -d < my-cached-animation.rgb.gz | ./rpi-led-matrix-cat
done
And streaming animations in real time over the network via SSH, which is especially useful for debugging locally and visualising the audio signal of MPD running my computer:
./render-animation | ssh -t user@hostname /root/rpi-led-matrix-cat
Note: As of writing, the this program can be found on my Github profile. I intend to contribute it upstream when It's done.
Shaders
One of the programs that could work with my LED-panels through pipes was Shady, a program that I initially started (and abandoned) over a year ago to make funny stuff for the LED-Banner at RevSpace. I resumed working on it a few weeks earlier because I got a working LED-Banner of my own.
The program works by rendering OpenGL fragment shaders to an RGB24 format which could then be piped to wherever needed. These shaders are small programs that can render an image by calculating the color for each pixel on the screen individually. Fragment shaders were originally intended to make up only a small part of the OpenGL graphics pipeline. But since fragment shaders can be abused to perform ray tracing, they have been a tool for some people in the demoscene to create amazing animations.
Demo's are available on websites like ShaderToy, which environment I emulate in Shady. I downloaded some shaders and rendered them. This is the result applied to my cube:
https://polyfloyd.net/img/opengl-shaders-ledcube/shaders-glsl.webm
Pretty cool, huh? But now, my program is just rendering a flat image which, of course, does not map correctly to the 3-dimensional surface of a cube. Let's get that working...
Mapping
Mapping a flat image to a cube is not that hard, the real challenge is writing software that wraps animations over the correct edges. So far, I have came up with two solutions to this problem:
2D to 3D space
The cube is a 3D object with pixels also in 3D space. If I can map the 2D positions of the pixels in the produced image to the 3D positions of the pixels on the surface of the cube, I can use these coordinates to graph images much like shaders do.
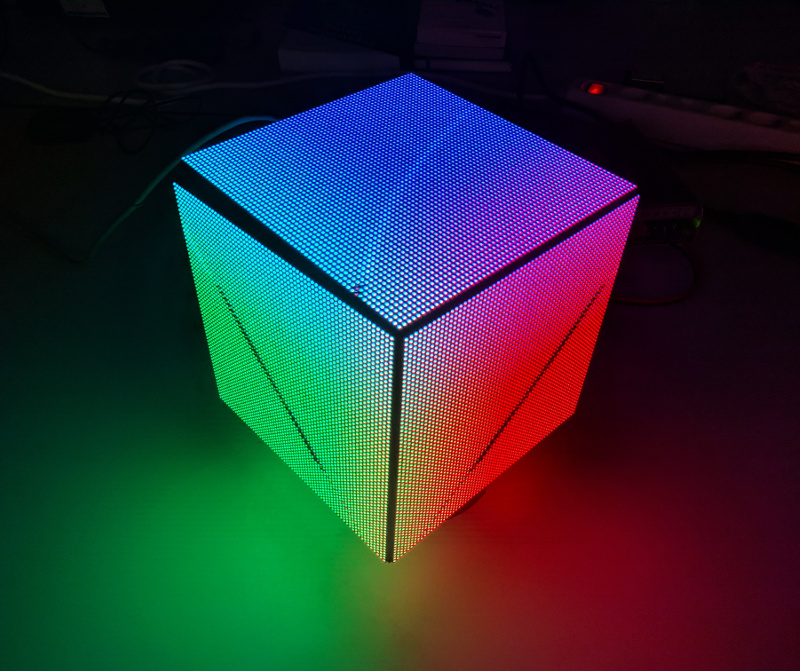
I programmed a shader to do this and use the 3D position of each pixel as a color, mapping each axis to a red, green or blue respectively. This creates a visualisation of the RGB color space:
You can download the shader here: https://polyfloyd.net/img/opengl-shaders-ledcube/src-3d.glsl
This visualization was also very useful in finding out which areas on the rendered image matched which panels and orientation on the cube.
3D to Spherical
Now that I can draw in 3D, I could apply this mapping to create a new kind of mapping, one that gives me a 2D surface to draw on. If we consider a cube just a sphere with extra corners, we can sort of apply sphere projection methodologies to cubes.
I added a new translation step to my shader to map the 3D positions from the previous step to polar coordinates. Using the resulting 2D coordinate as an index for a texture, I could now wrap images all the way around the cube. The mapping matches that of the Mercator Projection commonly used for world maps, so the obvious step was to load a map of the world:
https://polyfloyd.net/img/opengl-shaders-ledcube/shaders-globe.webm
The map used displays the global level of light pollution. The sparkly effect is most likely caused by a lack of mipmaps.
You can download the shader here: https://polyfloyd.net/img/opengl-shaders-ledcube/src-globe.glsl
Conclusion
This project is far from done! Hardware wise, I'd like to run it on batteries so I can pick it up and walk around. I'm also very interested in adding an accelerometer to perform image stabilisation and fluid simulations. For the software, I'm going to adapt some GLSL demo's to make use of the spherical mapping and write some of my own. If anything noteworthy happens, I'll post an update on this page.
I hope you enjoyed reading about my little project as much as I do working on it.
If you live nearby and want to see this project in real life, swing by Bitlair in Amersfoort, NL sometime.
Resources
- Shady, my GLSL rendering software: https://github.com/polyfloyd/shady
- Sebastius's buildlog with more details about the hardware:
- Shadertoy, the website I got most demo's from: https://shadertoy.com/
- The LED-Panels used


