Projects/Oceanwave Lamp Esphome: verschil tussen versies
Uit Hackerspace Bitlair
< Projects
kGeen bewerkingssamenvatting |
kGeen bewerkingssamenvatting |
||
| (6 tussenliggende versies door dezelfde gebruiker niet weergegeven) | |||
| Regel 5: | Regel 5: | ||
|info=Now with PWM | |info=Now with PWM | ||
|status=Finished | |status=Finished | ||
|Picture=OceanWaveLamp_20260118_225325.jpg | |||
}} | }} | ||
I found an "Ocean Wave" lamp in a drawer this weekend. It's something I got from AliExpress at one point because I thought it would be neat for themed lighting in my living room. But I never got around to actually using it. It's not that it's bad (ok, maybe a bit), but it is just a hassle to use it. | I found an "Ocean Wave" lamp in a drawer this weekend. It's something I got from AliExpress at one point because I thought it would be neat for themed lighting in my living room. But I never got around to actually using it. It's not that it's bad (ok, maybe a bit), but it is just a hassle to use it. | ||
| Regel 17: | Regel 18: | ||
The lamp consists of two parts bolted together with a mechanism that makes it possible to adjust the projection angle. The base contains the electronics and buttons, the top part has a transparent top with some jiggly texture that acts as a lens. Within the top is another smaller jiggly lens with a panel with 12 LEDs, 4 for each color channel, underneath. | The lamp consists of two parts bolted together with a mechanism that makes it possible to adjust the projection angle. The base contains the electronics and buttons, the top part has a transparent top with some jiggly texture that acts as a lens. Within the top is another smaller jiggly lens with a panel with 12 LEDs, 4 for each color channel, underneath. | ||
[[File:OceanWaveLamp_20260118_185944.jpg|thumb|right|200px|View of the interior lens]] | |||
The smaller interior lens is moved by a small motor which causes the light to be scattered in a random moving pattern. | The smaller interior lens is moved by a small motor which causes the light to be scattered in a random moving pattern. | ||
| Regel 22: | Regel 24: | ||
Some genius thought that people purchasing this would be down to listen to ambient noises through the shittiest speakers known to humankind, so it also has that built into it. It has an SD-card slot for if you truly despise your eardrums. | Some genius thought that people purchasing this would be down to listen to ambient noises through the shittiest speakers known to humankind, so it also has that built into it. It has an SD-card slot for if you truly despise your eardrums. | ||
<gallery> | |||
File:OceanWaveLamp 20260118 185216.jpg|Powered off | |||
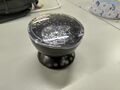
File:OceanWaveLamp_20260118_225325.jpg|Powered on | |||
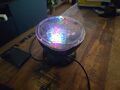
File:OceanWaveLamp_20260118_225626.jpg|The projected pattern | |||
</gallery> | |||
=== Teardown === | === Teardown === | ||
| Regel 37: | Regel 45: | ||
I wanted to keep the FETs to drive the LEDs and motor so I kept the MCU circuit board. I did some poking into what I presumed to be the collector contacts of the FETs by shorting them to a 3.3V contact. The LEDs powered on, so I knew that I could just attach those to the GPIOs of the ESP. | I wanted to keep the FETs to drive the LEDs and motor so I kept the MCU circuit board. I did some poking into what I presumed to be the collector contacts of the FETs by shorting them to a 3.3V contact. The LEDs powered on, so I knew that I could just attach those to the GPIOs of the ESP. | ||
[[File:OceanWaveLamp_20260118_183410.jpg|thumb|right|200px|Adding an ESP32]] | |||
I then added the ESP and did some testing. When all was well, I added comical amounts of hot glue and closed it back up. | I then added the ESP and did some testing. When all was well, I added comical amounts of hot glue and closed it back up. | ||
== Esphome == | An interesting thing about adding Esphome is that it is now possible to actually dim the light and start/stop the motion separately. | ||
=== Esphome Config === | |||
<syntaxhighlight lang="yaml" line> | <syntaxhighlight lang="yaml" line> | ||
esphome: | esphome: | ||
| Regel 82: | Regel 93: | ||
blue: blue | blue: blue | ||
on_turn_on: | on_turn_on: | ||
- | - switch.turn_on: motion | ||
on_turn_off: | on_turn_off: | ||
- | - switch.turn_off: motion | ||
switch: | |||
- platform: output | |||
id: motion | |||
name: "Motion" | |||
output: motor | |||
output: | output: | ||
Huidige versie van 18 jan 2026 22:07
| Project: Oceanwave Lamp Esphome | |
|---|---|
 | |
| Beschrijving | Now with PWM |
| Start | 2026-01-18 |
| Contact | Polyfloyd |
| Status | Finished |
I found an "Ocean Wave" lamp in a drawer this weekend. It's something I got from AliExpress at one point because I thought it would be neat for themed lighting in my living room. But I never got around to actually using it. It's not that it's bad (ok, maybe a bit), but it is just a hassle to use it.
So could it be made easier?
Sure thing, I could just open it up and slap an ESP32 on it. That way I can hook it into my Home Assistant setup and have it automatically switch on whenever I select a specific lighting scene.
The Device
The lamp consists of two parts bolted together with a mechanism that makes it possible to adjust the projection angle. The base contains the electronics and buttons, the top part has a transparent top with some jiggly texture that acts as a lens. Within the top is another smaller jiggly lens with a panel with 12 LEDs, 4 for each color channel, underneath.

The smaller interior lens is moved by a small motor which causes the light to be scattered in a random moving pattern.
The buttons are a kind of capacitive sensors and absolutely terrible to use. It usually takes about 4 presses to actually trigger a button.
Some genius thought that people purchasing this would be down to listen to ambient noises through the shittiest speakers known to humankind, so it also has that built into it. It has an SD-card slot for if you truly despise your eardrums.
-
 Powered off
 -
 Powered on
 -
 The projected pattern


Teardown

The lamp can be easily opened up by removing two screws under some rubber pads at the bottom.
This reveals two circuit boards. One with the capacitive touch interface and the other with an MCU and some FETs and other crap.
The R, G and B LEDs all have their own wire running to the board which is neatly labeled. Not too far from the board contacts are a bunch of FETs to drive them. The same goes for the motor, which has 2 wires. Through some volt- and continuity measuring I figured out where these circuits could be powered.
Hacking

I got rid of the button board to make some more room. Likewise, I was not interested in the speakers, so I cut those wires.
I wanted to keep the FETs to drive the LEDs and motor so I kept the MCU circuit board. I did some poking into what I presumed to be the collector contacts of the FETs by shorting them to a 3.3V contact. The LEDs powered on, so I knew that I could just attach those to the GPIOs of the ESP.

I then added the ESP and did some testing. When all was well, I added comical amounts of hot glue and closed it back up.
An interesting thing about adding Esphome is that it is now possible to actually dim the light and start/stop the motion separately.
Esphome Config
esphome:
  name: oceanwave
  friendly_name: Oceanwave

esp32:
  board: esp32thing
  framework:
    type: esp-idf

logger:

wifi:
  ssid: !secret wifi_ssid
  password: !secret wifi_password
  reboot_timeout: 3min

ota:
  platform: esphome
  password: !secret ota_password

mqtt:
  broker: mqtt.local
  discovery: false

api:

sensor:
  - platform: wifi_signal
    name: "WiFi Signal dB"
    update_interval: 10s
    state_topic: esphome/oceanwave/wifi_signal
    retain: false

light:
  - platform: rgb
    id: rgb_light
    name: "Light"
    red: red
    green: green
    blue: blue
    on_turn_on:
      - switch.turn_on: motion
    on_turn_off:
      - switch.turn_off: motion

switch:
  - platform: output
    id: motion
    name: "Motion"
    output: motor

output:
  - platform: ledc
    id: red
    pin: 22
  - platform: ledc
    id: green
    pin: 17
  - platform: ledc
    id: blue
    pin: 21
  - platform: gpio
    id: motor
    pin: 26
